As winter gives way to the vibrant days of spring, it’s time to prepare your raised garden beds for a new growing season. Raised beds are an excellent way to garden, offering better drainage, improved soil quality, and many other benefits. In this blog post, we’ll guide you through the essential steps to prepare your raised garden beds for spring, ensuring a bountiful and successful harvest.
1. Clear and Clean the Beds
Before you start any new planting, it’s crucial to clear your garden beds of any debris, dead plants, or weeds left over from the previous season. Rake away fallen leaves and pull out any persistent weeds to provide a clean slate for your spring garden – then put the leaves back, as they are excellent for keeping the moisture trapped.
2. Assess and Amend the Soil
Check the condition of your soil by digging a small sample. You’ll want to make sure it’s neither too compacted nor too loose. If the soil is too compacted, it can impede root growth, while overly loose soil may not retain moisture well. To amend your soil:
Add organic matter: Incorporate well-rotted compost or aged manure to improve soil structure and fertility.
Test and adjust pH: Consider a soil pH test and adjust with lime or sulphur as needed to bring it into the ideal range for your chosen crops.
3. Plan Your Garden Layout
Determine where you’ll plant different crops and arrange them strategically based on their compatibility, growth habits, and light requirements. Crop rotation is an effective strategy to reduce the risk of pests and diseases.
4. Add Mulch
To prevent weeds in your raised beds, apply a layer of organic mulch, such as straw, wood chips, or compost. Mulch also helps retain soil moisture and regulate soil temperature.
5. Installing Drip Irrigation or Soaker Hoses – for selected plants
For efficient watering, consider installing a drip irrigation system or soaker hoses. These ensure water is delivered directly to the root zone, reducing water wastage and minimizing the risk of fungal diseases from overhead watering.
6. Fertilize Appropriately
Choose an organic or balanced fertilizer to provide essential nutrients to your plants. Follow the recommendations on the product label or conduct a soil test to determine specific nutrient needs.
7. Start Seeds Indoors (If Applicable)
Consider sowing seeds indoors in seed trays or pots for plants that require an early start. This gives them a head start before transplanting them into your raised beds when the weather warms up.
8. Plant and Mulch Again
As the weather permits, begin planting your chosen crops. After planting, apply a fresh layer of mulch around the base of the plants to help maintain soil moisture and prevent weed growth.
9. Monitor and Maintain
Throughout the spring, keep a watchful eye on your garden beds. Water as needed, monitor for pests, and address any issues promptly to ensure the health and vitality of your plants.
Proper preparation and care will primate your raised garden beds for a successful spring growing season. As the days grow longer and warmer, you’ll be rewarded with a bounty of fresh produce and vibrant blooms, all thanks to the effort you put into preparing your garden beds. Happy gardening!
New Zealand is renowned for its breathtaking natural beauty, from snow-capped mountains to pristine lakes and lush forests. While many visitors explore these wonders by car, there’s a unique and enchanting way to experience this paradise – by train. New Zealand’s rail tourism offers a remarkable opportunity to see the country’s landscapes in a relaxed and immersive manner. In this blog post, we’ll take you on a journey through some of the most scenic train routes in New Zealand, showcasing the country’s diverse geography and rich cultural history.
1. TranzAlpine Railway
The TranzAlpine Railway is often hailed as one of the most scenic train journeys in the world. This 139-mile route traverses the Southern Alps, connecting Christchurch on the east coast to Greymouth on the west. As the train winds through the breathtaking Arthur’s Pass National Park, you’ll witness the beauty of the South Island’s rugged mountains, deep gorges, and lush beech forests. Keep your camera ready for snapshots of the majestic Waimakariri River and the snow-capped peaks of the Southern Alps.
2. Coastal Pacific
For a coastal rail adventure, the Coastal Pacific is the perfect choice. This journey takes you from Christchurch to Picton, offering views of the stunning Kaikoura coast. As you travel, you’ll be treated to vistas of the Pacific Ocean, vineyards, and the rugged Kaikoura mountain range. Don’t forget to watch for seals, dolphins, and even whales in the ocean.
3. Hauraki Rail Trail
The Hauraki Rail Trail is an extraordinary cycling and rail experience located on the North Island. This historic railway takes you through the Karangahake Gorge and the stunning Waikino station. With a combination of train and bike rides, you can explore native forests, old mining relics, and tranquil river paths while enjoying the charm of this historic rail route.
4. Taumarunui to Stratford Forgotten World Highway
The Taumarunui to Stratford rail journey, known as the Forgotten World Highway, is nostalgic and awe-inspiring. The line passes through the heart of the North Island’s rugged terrain, with views of deep gorges, dense forests, and quiet countryside. It’s a unique experience, often taking travellers to places they’d never find otherwise.
New Zealand’s rail tourism offers travellers an unforgettable opportunity to explore the country’s stunning landscapes, rich history, and unique culture. Whether you choose to traverse the Southern Alps on the TranzAlpine Railway, admire the coastal beauty of the Coastal Pacific, delve into the wilds of the Taieri Gorge, or opt for one of the North Island’s historic routes, each journey is bound to be an adventure filled with remarkable scenery and memorable experiences. So, hop on board, relax in comfort, and let the rails carry you through the enchanting landscapes of New Zealand. It’s a journey you won’t soon forget.
My ideal glasshouse is a near-free upcycled style utilising old wooden windows and building walls to support it. My planning was a decision process, what do I want to build, what do I want to grow in it, and where’s the best place for this in our yard?
The outcome really needed to be an improvement on our makeshift shed. I knew I had the skills to build and make a suitable space for growing plants. The needs were simple:
Over 2 metres tall with a mono-pitch roof
water catchment
Reduce the wind, control the airflow
Hedgehog proof non-muddy work area floor
and able to catch the morning and all-day sun
Here’s the simple build list – building to my next-to-nothing budget, ideally under NZD 100. Although the actual build cost was $320, the most significant cost was the Clearlite and lumber to support the Clearlite.
Design, plan, and measure
Find and buy cheap old windows.
Collect the windows ready for installation.
Find and buy old wood for foundation and framing (< $60 total)
Collect the wood and materials needed.
Start planning the size and considering the windows
Demolish the old shed & save the screws for reuse
Create the foundation
Create the first wall
Finish all the walls and structure
Put the roof on.
Tools required:
Circular drop saw
Screwdriver and plenty of various-sized screws (75mm to 100mm)
FINDING & BUYING
I had seen before starting this project that old wooden windows were freely and readily available on TradeMe. It was easy to source old windows, and after a few bids for $1 (one dollar), I was on my way with a small collection of various-sized wooden windows.
What I had not factored in was that the glass was weighty, and the wooden frames were solid wood, which meant that I needed help collecting the windows.
I left buying the Clearlite roofing to the last task, as several other factors needed resolving.
DELIVERY
Collecting all the windows was quite an ordeal. Travelling to many locations to pick up large and heavy old windows, some in poor condition, others in near-new condition.
DEMOLITION
Already occupying the preferred location was a makeshift woodshed. The shed comprised pallets and other recycled building materials, some of which could be reused in the glasshouse build.
TIDY & FOUNDATION
After the areas had been defined and cleared, the next task was to level and establish the foundation.
The design that I had made used piles to keep the main frame away from the soil. However, fitting my limited budget, the piles I had access to included bricks and treated posts. I used the posts to make four corner piles, and supporting these were stacks of bricks.
WALLS
The walls are 90% windows, which are very heavy.
ROOF
Quite possibly the easiest part of the build.
I purchased lumber and Clearlite (clear fibreglass corrugated sheets) and screwed these into place.
RESULTS
In the first year, I recovered the total cost of the build from fresh produce.
Fresh organic tomatoes, cucumbers, basil, and microgreens.
Living in Leeston has many perks being away from the city, one of these perks is being close to Ashburton, and its fantastic disc golf course. We were lucky to have a peaceful day causally discovering the course, the first round was quite confusing, the map wasn’t as clear as we thought it could be, but we quickly discovered the course, and the second round was a breeze.
Improvements we’re hoping to see in time:
clearer map
indications on the cages what the tee number is
less dog walkers
more people discovering this amazing course
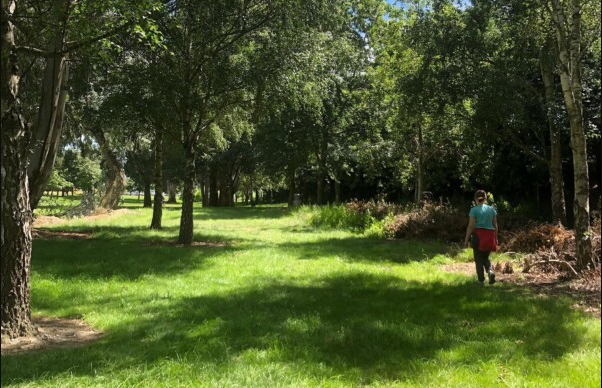
T13, T15, & T17 bases are on the paths/sidepaths, while all the other tee-off pads are concrete blocks and easily identified. Beautiful dappled light in treelined fairways.
A few months ago I downloaded a mobile app called ‘Life Cycle’ and allowed it to track and monitor my whereabouts and the amount of time spent at each location.
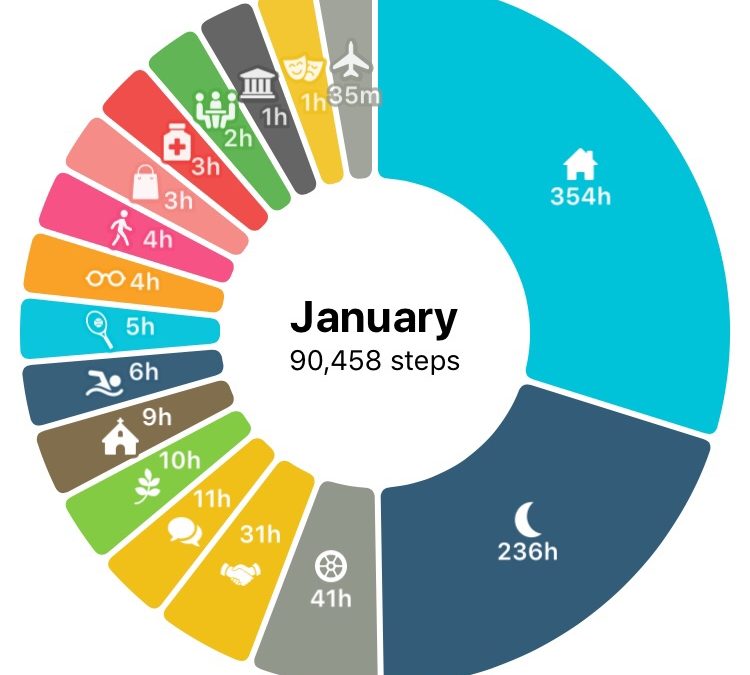
The tiny sliver of walking with only 21hours made up the result of 121,980 steps. Imagine what you could achieve in your garden for the same amount of energy. It could be transformed.
In December 2020, as you can see above I did a lot more activities including many interviews, meetings and meetup sessions. We also traveled to Mapua for Christmas so there are more locations to track.
In January 2021, an interesting factor is that dedicated walking is only 4hours compared to November 2020 with 21hours. I would personally prefer to be doing dedicated walking in nature than walking between tasks, however I’m loving being back at work having had 12 months off.
Did the garden get more focused time during this period? Yes it did. Sadly for the app the garden isn’t far enough away from ‘home’ that garden time isn’t registered as a separate event. I will review this and try to get a timed ‘gardening’ event. I’m expecting that I spend less than 2hours a day in the garden.
Yesterday, I did spend time weeding or as I like to think of it, refilling the compost heap. The above raised bed had several keepers and a diverse range of support plants. The support plants add great value to the compost.
I noticed that this season that the compost has really dried out so I added extra greens and dried grass and watered it down. The water is laced with live bacterial culture and makes a world of difference as long as the area remains moist. More on that another day.